
Slither Docker 环境搭建:从拉取镜像到成功扫描
Slither Docker 环境搭建:从拉取镜像到成功扫描
Web2 转战 Web3 第一周:我如何搞定 Slither 漏洞扫描环境?(内附 Docker 避坑指南) 🧵↓
#Solidity #Slither #BlockchainSecurity
通过本文,你将能:
- 在内网受限的虚拟机上,为Docker容器配置代理并访问外网。
- 使用固定镜像Digest,百分百复现本文的Slither扫描环境。
- 掌握
eth-security-toolbox镜像的初始状态与缺失依赖的安装方法。 - 对一个经典的ERC20重入漏洞合约完成你的第一次Slither扫描。
正文
镜像与容器
容器化环境可以隔离恶意合约,并快速切换不同版本的编译器环境
我使用的镜像的digest(固定镜像以保证可复现(非常重要))
1 | trailofbits/eth-security-toolbox@sha256:726b78aac10d4113a81ccc9db62bc2e781a2d136dcb10ad245a6bd1950c42744 |
Digest 是镜像内容的唯一哈希值,即使原镜像标签(如 latest)被更新,Digest 也能保证下载到完全一致的内容
在宿主机上查看镜像 digest / history
1 | docker inspect --format='{{index .RepoDigests 0}}' trailofbits/eth-security-toolbox:latest |
该镜像生成的容器里面的工具和版本如下:
1 | slither --version → 0.11.3 |
要使用slither主要会遇到3个问题:
- 是虚拟机(VMware上的ubuntu-24.04.3-live-server-amd64)不能访问外网,需要设置代理。
- docker容器不能访问网络,需要配置网络并设置代理。
- 该镜像未安装solc和foundry,需要安装。
设置代理
给虚拟机设置代理
1 | nano ~/.bashrc |
再文件最末尾添加
1 | alias proxy="export http_proxy=http://ip:port; export https_proxy=http://ip:port" |
ctrl+o 保存,回车确认
ctrl+x 退出
1 | source ~/.bashrc |
proxy 设置代理;noproxy 关闭代理。好用😋
拉取镜像
1 | docker pull trailofbits/eth-security-toolbox |
docker容器联网
1 | sudo docker run -it \ |
--network host创建的容器直接走虚拟机的网络,
--name solc_foundry取一个目的性强的名字,以防下次忘记,
--memory="3g" 设置内存限制,
-v /home/weeks/ethsec/BCScanner:/app 挂载目录,传输文件方便,容器销毁后,宿主机文件依旧存在。
容器内部再设置一遍代理,和配置虚拟机的代理一样,此处不再赘述。
如果中途退出容器,使用命令再次进入。
1 | docker exec -it <container_name_or_id> /bin/bash |
如果停止, 使用下面的命令将容器重新启动
1 | docker start |
扫描合约
安装solc,用slither扫描合约
1 | solc-select install 0.8.19 |
1 | slither Reentrancy_vulnerability.sol |
我一共扫描了两个合约。
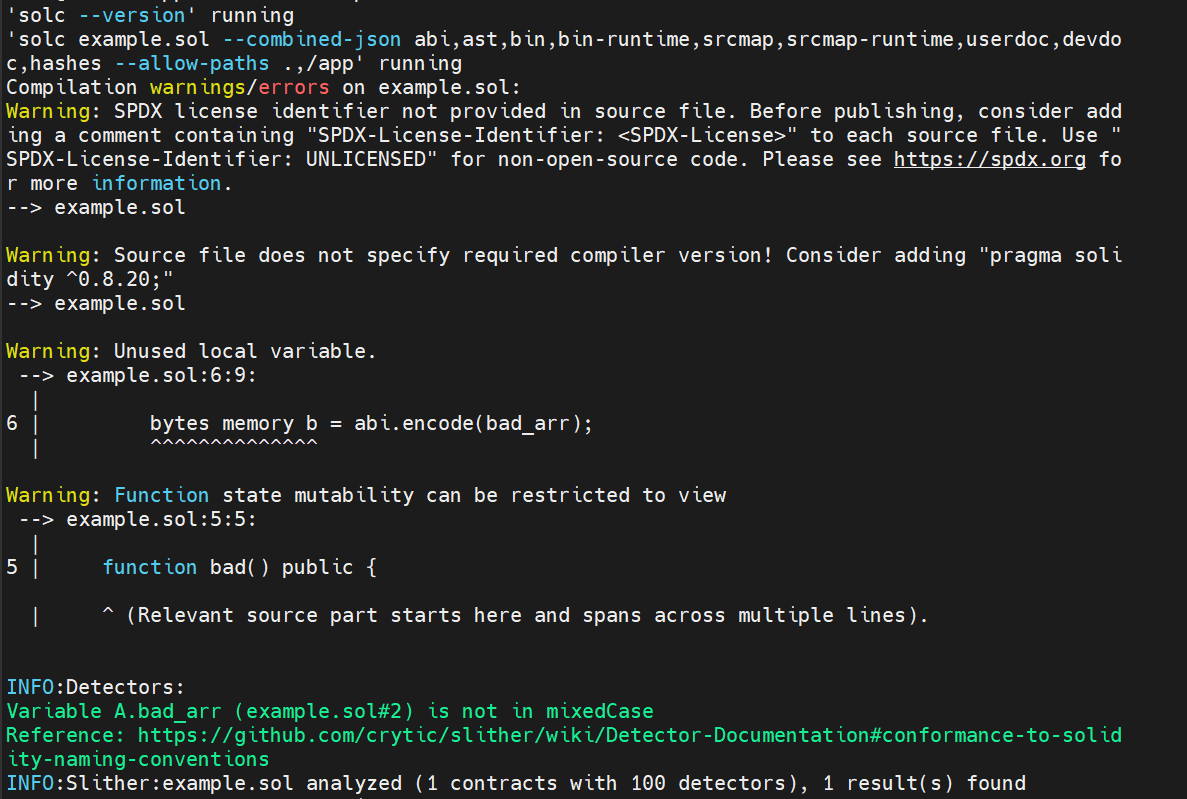
第一个合约内容如下,来自https://github.com/crytic/slither/wiki/Detector-Documentation#storage-abiencoderv2-array
1 | contract A { |
扫描结果如下,
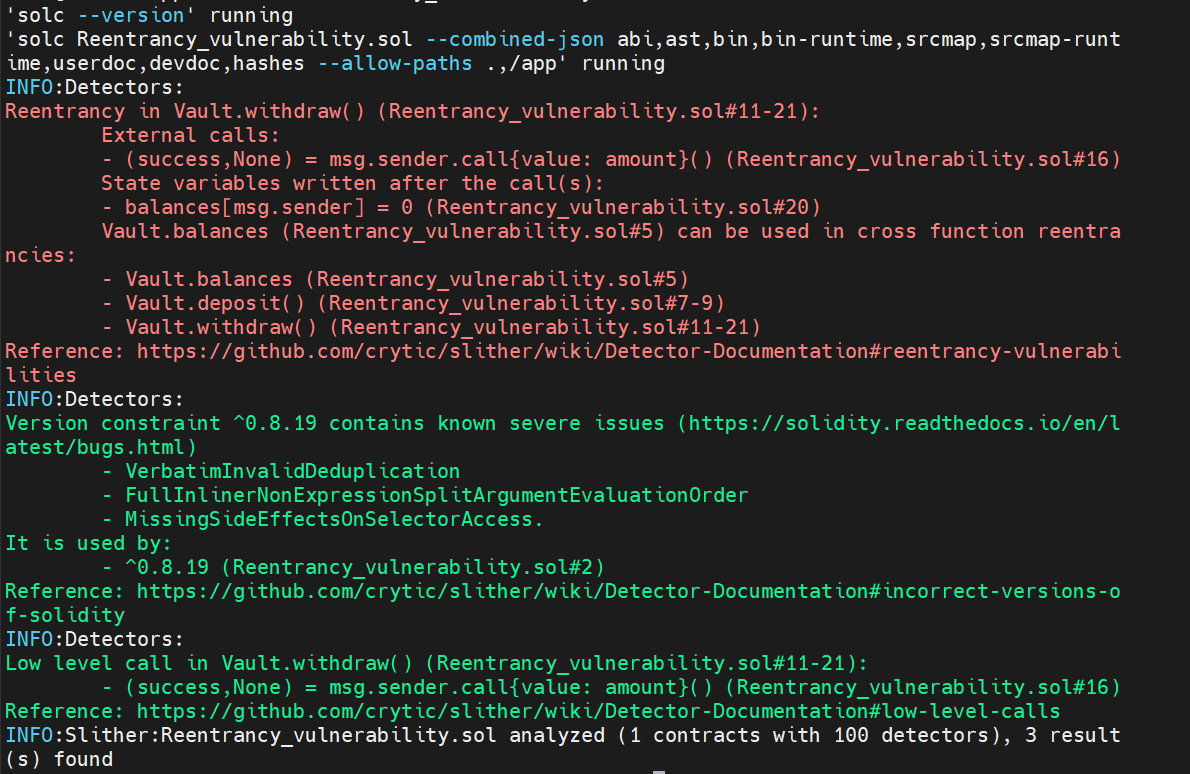
第二个合约内容如下,
1 | // SPDX-License-Identifier: MIT |
扫描结果如下,
下一步
接下来我会对合约的内容和结果进行分析。
下载foundry(等一等)
参考资料
- slither的的github仓库 https://github.com/crytic/slither
- The Trail of Bits Blog https://blog.trailofbits.com/
- https://hackenproof.com/run-bug-bounty
- eth-security-toolbox镜像 : https://github.com/trailofbits/eth-security-toolbox
- dockerhub:https://hub.docker.com/r/trailofbits/slither